This short article will help you set up Celery, Celery beat, and Redis in your Django project. Before, moving directly to code, let’s discuss the basics of Celery and Redis and why we actually need these powerful tools in our project.
Celery
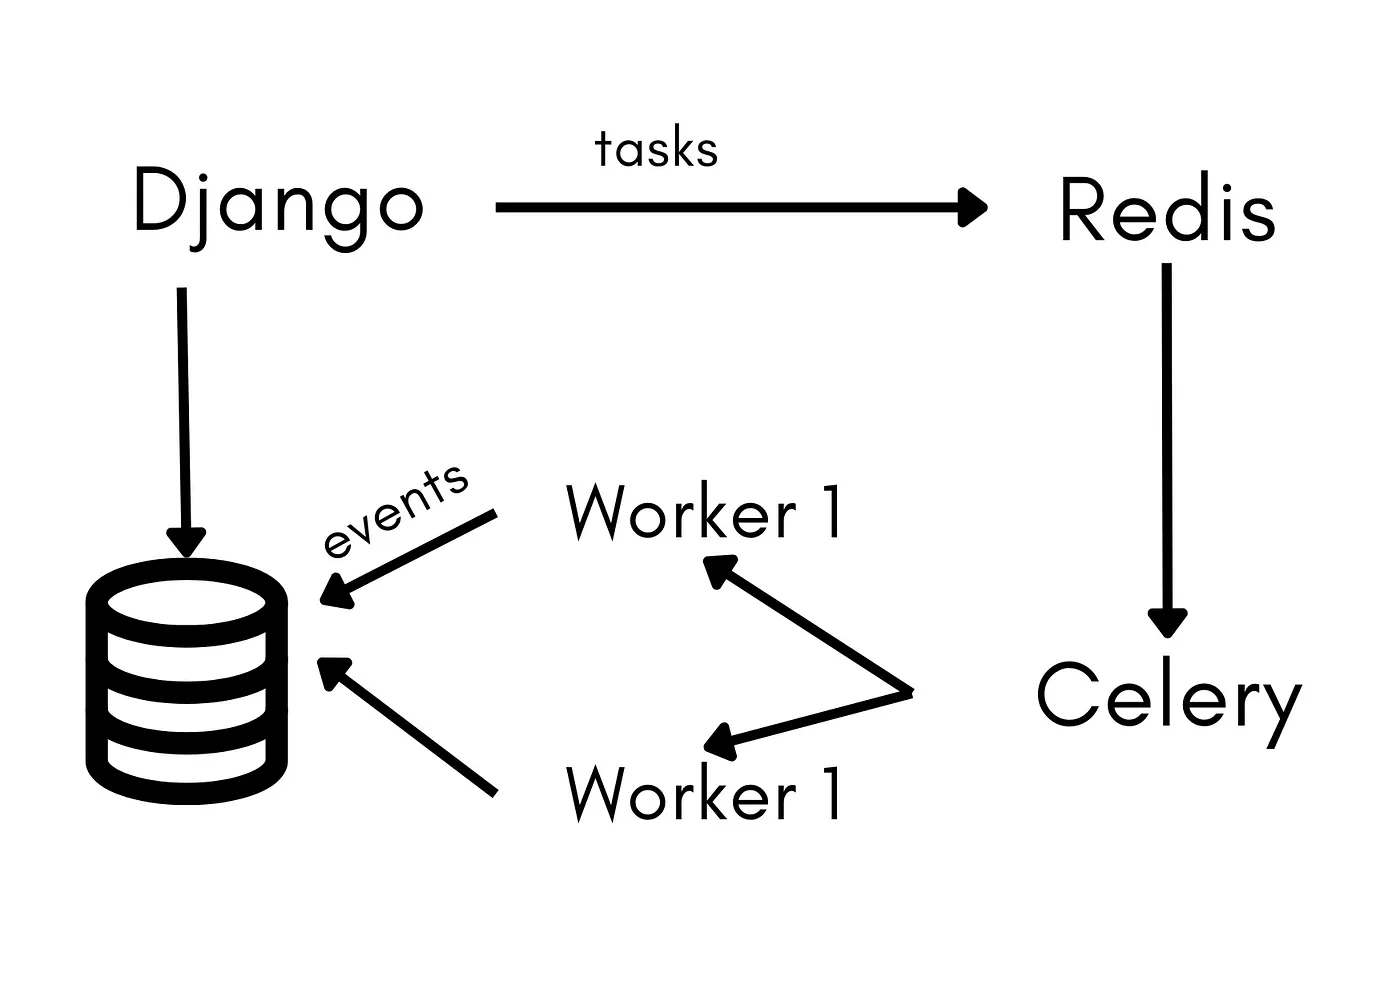
We sometimes have tasks in our project that require a lot of time to execute and we don't want to block our main thread to perform such tasks. e.g. sending an email to the user on successful account registration. We can afford a little delay in such a task's execution but we don't want to block other tasks because of them. To overcome such scenarios, we use Celery to execute such tasks asynchronously behind the scene. Celery is an asynchronous task queue or job queue. Dedicated workers constantly monitor task queues for new work to perform and brokers are the ones who deliver tasks to a worker. To know more about celery you can visit celery's official docs: https://docs.celeryq.dev/en/stable/getting-started/introduction.html
Celery Beat
There are tasks that need to execute repeatedly after regular intervals of time like sending a push notification to every user on a new item's arrival on an e-commerce site. Celery beat helps us to schedule such tasks at regular intervals.
Redis
Redis is an in-memory data store. In-memory data storage or database stores data in the computer’s main memory instead of the disk drive to produce quicker response times. So what happened is, when you try to access some data from the server, there is a chance that the data (you need) is requested by any other user as well. What we can do is, we can place the most demanding data in the cache so that our users don't need to wait for it. To know more about Redis you can visit official docs: https://redis.io/docs/
Step 1: [Project Creation]
Setup your Django project (with virtual env recommended)
django-admin startproject basicSetupStep 2: [Celery]
Install celery and django_celery_results (to get celery results in Django admin) using pip
pip install celery
pip install django-celery-results
Add celery configurations and django_celery_results in your installed_apps section of basicSetup/settings.py
INSTALLED_APPS = [
.
.
.
"django_celery_results",
]

# CELERY SETTINGS

CELERY_BROKER_URL = 'redis://127.0.0.1:6379'
CELERY_ACCEPT_CONTENT = ['application/json']
CELERY_RESULT_SERIALIZER = 'json'
CELERY_TASK_SERIALIZER = 'json'
CELERY_RESULT_BACKEND = 'django-db'
CELERY_TIMEZONE = 'Asia/Karachi' (you can write your own timezone)
Create a new file celery.py in basicSetup app and paste the below code
from __future__ import absolute_import, unicode_literals
import os

from celery import Celery
from django.conf import settings

os.environ.setdefault('DJANGO_SETTINGS_MODULE', 'basicSetup.settings')

app = Celery('basicSetup')
app.conf.enable_utc = False

app.config_from_object(settings, namespace='CELERY')

app.autodiscover_tasks()

@app.task(bind=True)
def debug_task(self):
    print(f"Request: {self.request!r}")
basicSetup.__init__.py
# This will make sure the app is always imported when
# Django starts so that shared_task will use this app.
from .celery import app as celery_app


__all__ = ("celery_app",)
Twist:
Celery works with Redis.
Redis Server listens to the client and enqueues the task to the task queue. In simple words, Django and Celery use Redis to communicate with each other. It means we have to install Redis as well to make our celery work perfectly fine.
If you are a Linux user, you can install Redis using snap:
sudo snap install redisFor MacOs, download the latest Redis version from https://
redis.io/download . Unzip the tar.gz file, enter the redis directory, and compile Redis using the make command, as follows:
cd redis
make
For Windows, the preferred method to install Redis is to enable the Windows Subsystem for Linux (WSL) and install it in the Linux system. You can read instructions on enabling WSL and installing Redis at https://redislabs.com/blog/redis-on-windows-10/
Now, to check that redis is successfully installed in our system, open redis-cli and enter ping. If you get PONG as output then congratulations you have successfully installed redis in your system.
$ redis-cli
127.0.0.1:6379> ping
PONG
To use Redis with python, you need to install the python redis client for the Redis database and a key-value store.
pip install redisAll set, now let's start a celery worker
celery -A basicSetup.celery worker -l info It should give celery@username ready (If not, it means you have done something wrong in the above configuration)
Step 3: [Celery Beat]
pip install django-celery-beatAdd celery beat configurations and django_celery_beat in your installed_apps section of basicSetup/settings.py
INSTALLED_APPS = [
.
.
.
"django_celery_beat",
]

# CELERY BEAT SCHEDULER

CELERY_BEAT_SCHEDULER = 'django_celery_beat.schedulers:DatabaseScheduler'
Now check whether our celery beat worker is running fine or not (Don’t forget to apply your migrations before running the below command)
celery -A basicSetup beat -l infoStep 4: [Redis cache]
Install django-redis, a fully featured Redis cache backend for Django.
pip install django-redisAfter that, add redis cache configurations in settings.py
# REDIS CACHE

CACHES = {
    "default": {
        "BACKEND": "django_redis.cache.RedisCache",
        "LOCATION": f"redis://127.0.0.1:6379/1",
        "OPTIONS": {
            "CLIENT_CLASS": "django_redis.client.DefaultClient",
        },
    }
}
Done!
Hope you like this article, feel free to share your feedback in the chatbox.